Difference between revisions of "AD&D Ravenloft"
Cattwister (talk | contribs) |
Cattwister (talk | contribs) m |
||
| (40 intermediate revisions by 2 users not shown) | |||
| Line 3: | Line 3: | ||
{{ArticleLogoMenu||rv-logo.gif|AD&D Ravenloft|250px|__NOTOC__|QM-RalPartha}} | {{ArticleLogoMenu||rv-logo.gif|AD&D Ravenloft|250px|__NOTOC__|QM-RalPartha}} | ||
| − | [[Ral Partha]] produced this [[ | + | [[Ral Partha]] produced this [[{{PAGENAME}}|Ravenloft]] range for the ''AD&D'' campaign setting. |
{{clear}} | {{clear}} | ||
<br> | <br> | ||
| − | <div class="contents-1 columns- | + | <div class="contents-1 columns-20"> |
<p class="contents-heading">Contents</p> | <p class="contents-heading">Contents</p> | ||
* '''Box Sets''' | * '''Box Sets''' | ||
| Line 41: | Line 41: | ||
* [[#11-124|11-124 Alfred Timothy]] | * [[#11-124|11-124 Alfred Timothy]] | ||
* [[#11-125|11-125 The Witches]] | * [[#11-125|11-125 The Witches]] | ||
| + | </div> | ||
</div> | </div> | ||
<br> | <br> | ||
| − | + | ===<span id="10-511">10-511 Ravenloft: Denizens</span>=== | |
| − | |||
| − | |||
<gallery> | <gallery> | ||
| − | + | file:rp-10-511-box.jpg|10-511<br>Ravenloft: Denizens<br>{{smg|(box)}} | |
| − | + | file:rp-10-511-bob.jpg|10-511<br>Ravenloft: Denizens<br>{{smg|(box back)}} | |
| − | + | file:rp-10-511-bobc.jpg|10-511<br>Ravenloft: Denizens<br>{{smg|(box detail)}} | |
| − | + | file:rp-10-511-boxcs.jpg|10-511<br>Ravenloft: Denizens<br>{{smg|(catalog)}} | |
| − | + | file:rp-10-511a.jpg|10-511 (a)<br>Count Strahd Von Zarovich<br>{{smgl|Dennis Mize}} | |
| − | + | file:rp-10-511b.jpg|10-511 (b)<br>Damsel<br>{{smgl|Dennis Mize}} | |
| − | + | file:rp-10-511c.jpg|10-511 (c)<br>Harkon Lukas<br>{{smgl|Dennis Mize}} | |
| − | + | file:rp-10-511d.jpg|10-511 (d)<br>Gypsy<br>{{smgl|Dennis Mize}} | |
| − | + | file:rp-10-511e.jpg|10-511 (e)<br>Adam<br>{{smgl|Dennis Mize}} | |
| − | + | file:rp-10-511f.jpg|10-511 (f)<br>Vampiress<br>{{smgl|Dennis Mize}} | |
| − | + | file:rp-10-511g.jpg|10-511 (g)<br>Azalin<br>{{smgl|Dennis Mize}} | |
| − | + | file:rp-10-511h.jpg|10-511 (h)<br>Hazlik<br>{{smgl|Dennis Mize}} | |
| − | + | file:rp-10-511i.jpg|10-511 (i)<br>Banshee<br>{{smgl|Dennis Mize}} | |
| − | + | file:RP-11-064b.jpg|10-511 (j)<br>Lord Soth<br>{{smgl|Dennis Mize}} | |
</gallery> | </gallery> | ||
<br> | <br> | ||
| − | + | ===<span id="10-515">10-515 Ravenloft: Castle Forlorn</span>=== | |
<gallery> | <gallery> | ||
| − | + | file:rp-10-515-box.jpg|10-515<br>Ravenloft: Castle Forlorn<br>{{smg|(box)}} | |
| − | + | file:rp-10-515-bob.jpg|10-515<br>Ravenloft: Castle Forlorn<br>{{smg|(box back)}} | |
| − | + | file:rp-10-515-bobc.jpg|10-515<br>Ravenloft: Castle Forlorn<br>{{smg|(detail)}} | |
| − | + | file:rp-10-515-boxcs.jpg|10-515<br>Ravenloft: Castle Forlorn<br>{{smg|(catalog)}} | |
| − | + | file:rp-10-515a.jpg|10-515 (a)<br>Mark ApBlanc<br>{{smgl|Dennis Mize}} | |
| − | + | file:rp-10-515b.jpg|10-515 (b)<br>Tristen ApBlanc<br>{{smgl|Dennis Mize}} | |
| − | + | file:rp-10-515c.jpg|10-515 (c)<br>Morholt ApBlanc<br>{{smgl|Dennis Mize}} | |
| − | + | file:rp-10-515d.jpg|10-515 (d)<br>Rual<br>{{smgl|Dennis Mize}} | |
| − | + | file:rp-10-515e.jpg|10-515 (e)<br>Maeve the Druid<br>{{smgl|Dennis Mize}} | |
| − | + | file:rp-10-515f.jpg|10-515 (f)<br>Shelaugh the Druid<br>{{smgl|Dennis Mize}} | |
| − | + | file:rp-10-515g.jpg|10-515 (g)<br>The Ghost<br>{{smgl|Dennis Mize}} | |
| − | + | file:rp-10-515h.jpg|10-515 (h)<br>Herrd of Clan ApKie<br>{{smgl|Dennis Mize}} | |
| − | + | file:rp-10-515l.jpg|10-515 (i)<br>The Wild Huntsman<br>{{smgl|Dennis Mize}} | |
| − | + | file:rp-10-515m.jpg|10-515 (j)<br>Huntsman Hound 1<br>{{smgl|Dennis Mize}} | |
| − | + | file:rp-10-515n.jpg|10-515 (k)<br>Huntsman Hound 2<br>{{smgl|Dennis Mize}} | |
| − | + | file:rp-10-515o.jpg|10-515 (l)<br>Huntsman Hound 3<br>{{smgl|Dennis Mize}} | |
</gallery> | </gallery> | ||
<br> | <br> | ||
| − | + | ===<span id="10-517">10-517 Ravenloft: Mordenheim's Lab</span>=== | |
<gallery> | <gallery> | ||
| − | + | file:rp-10-517-box.jpg|10-517<br>Ravenloft: Mordenheim's Lab<br>{{smg|(box)}} | |
| − | + | file:rp-10-517-bob.jpg|10-517<br>Ravenloft: Mordenheim's Lab<br>{{smg|(box back)}} | |
| − | + | file:rp-10-517-bobc.jpg|10-517<br>Ravenloft: Mordenheim's Lab<br>{{smg|(box detail)}} | |
| − | + | file:rp-10-517-cat.jpg|10-517<br>Ravenloft: Mordenheim's Lab<br>{{smg|(catalog)}} | |
| − | + | file:rp-10-517a.jpg|10-517 (a)<br>Dr. Victor Mordenheim | |
| − | + | file:rp-10-517b.jpg|10-517 (b)<br>The Lovely Elise | |
| − | + | file:rp-10-517c.jpg|10-517 (c)<br>Lab Assistant | |
| − | + | file:rp-10-517d.jpg|10-517 (d)<br>The Monster | |
| − | + | file:rp-10-517e.jpg|10-517 (e)<br>Large Apparatus<br>{{smg|(Machinery of Creation 1)}} | |
| − | + | file:rp-10-517f.jpg|10-517 (f)<br>Restraining Table<br>{{smg|(Machinery of Creation 2)}} | |
| − | + | file:rp-10-517g.jpg|10-517 (g)<br>Small Apparatus<br>{{smg|(Machinery of Creation 3)}} | |
| − | + | file:rp-10-517h.jpg|10-517 (h)<br>Workbench<br>{{smg|(lab equipment)}} | |
</gallery> | </gallery> | ||
* Sculptors: [[Jeff Wilhelm]], [[Dennis Mize]] | * Sculptors: [[Jeff Wilhelm]], [[Dennis Mize]] | ||
<br> | <br> | ||
| − | + | ===<span id="11-100">11-100 Greater Wolfweres</span>=== | |
| − | |||
| − | |||
<gallery> | <gallery> | ||
| − | + | file:partha-ravenloft-100.jpg|11-100<br>Greater Wolfweres<br>{{smg|(catalog)}} | |
| − | + | file:partha-ravenloft-100a.jpg|11-100 (a)<br>Greater Wolfwere | |
| − | + | file:partha-ravenloft-100b.jpg|11-100 (b)<br>Greater Wolfwere | |
| − | + | file:partha-ravenloft-100c.jpg|11-100 (c)<br>Greater Wolfwere | |
| − | + | file:partha-ravenloft-100d.jpg|11-100 (d)<br>Greater Wolfwere | |
</gallery> | </gallery> | ||
<br> | <br> | ||
| − | + | ===<span id="11-101">11-101 Werebats</span>=== | |
<gallery> | <gallery> | ||
| − | + | file:partha-ravenloft-101-03.jpg|11-101<br>Werebats<br>{{smg|(blister)}} | |
| − | + | file:partha-ravenloft-101a.jpg|11-101<br>Werebats<br>{{smg|(catalog)}} | |
| − | + | file:partha-ravenloft-101.jpg|11-101 (a)<br>Werebat 1<br>{{smgl|Dennis Mize}} | |
| − | + | file:partha-ravenloft-101b.jpg|11-101 (b)<br>Werebat 2<br>{{smgl|Dennis Mize}} | |
| + | file:partha-ravenloft-101c.jpg|11-101 (c)<br>Werebat 3<br>{{smgl|Dennis Mize}}{{Gallery-Ribbon}} | ||
</gallery> | </gallery> | ||
<br> | <br> | ||
| − | + | ===<span id="11-102">11-102 Greater Mummies</span>=== | |
<gallery> | <gallery> | ||
| − | + | file:partha-11-102-03.jpg|11-102<br>Greater Mummies<br>{{smg|(blister)}} | |
| − | + | file:partha-ravenloft-102.jpg|11-102<br>Greater Mummies<br>{{smg|(4pcs, catalog)}} | |
| − | + | file:partha-ravenloft-102a.jpg|11-102 (a)<br>Mummy Lord | |
| − | + | file:partha-ravenloft-102b.jpg|11-102 (b)<br>Queen | |
| − | + | file:partha-ravenloft-102c.jpg|11-102 (c)<br>Mummy Servant 1 | |
| − | + | file:partha-ravenloft-102d.jpg|11-102 (d)<br>Mummy Servant 2 | |
</gallery> | </gallery> | ||
<br> | <br> | ||
| − | + | ===<span id="11-103">11-103 Demihuman Vampires</span>=== | |
<gallery> | <gallery> | ||
| − | + | file:partha-11-103-03.jpg|11-103 (d)<br>Demihuman Vampires<br>{{smg|(blister)}} | |
| − | + | file:partha-ravenloft-103.jpg|11-103<br>Demihuman Vampires<br>{{smg|(3pcs, catalog)}} | |
| − | + | file:partha-ravenloft-103a.jpg|11-103 (a)<br>Demihuman Vampire<br>Dwarf | |
| − | + | file:partha-ravenloft-103b.jpg|11-103 (b)<br>Demihuman Vampire<br>Elf | |
| − | + | file:partha-ravenloft-103c.jpg|11-103 (c)<br>Demihuman Vampire<br>Halfling | |
</gallery> | </gallery> | ||
<br> | <br> | ||
| − | === | + | ===<span id="11-104">11-104 Vampyres</span>=== |
<gallery> | <gallery> | ||
| − | + | file:RP-11-104-blister.jpg|11-104<br>Vampyres<br>(3 pieces)<br>{{smg|(blister)}} | |
| − | + | file:partha-ravenloft-104.jpg|11-104<br>Vampyres<br>{{smg|(3pcs, catalog)}} | |
| − | + | file:partha-ravenloft-104a.jpg|11-104 (a)<br>Vampyres Male | |
| − | + | file:partha-ravenloft-104b.jpg|11-104 (b)<br>Vampyres Female 1 | |
| + | file:partha-ravenloft-104c.jpg|11-104 (c)<br>Vampyres Female 2 | ||
</gallery> | </gallery> | ||
<br> | <br> | ||
| − | + | ===<span id="11-105">11-105 Village Mob</span>=== | |
<gallery> | <gallery> | ||
| − | + | file:partha-ravenloft-105-03.jpg|11-105<br>Village Mob<br>{{smg|(blister)}} | |
| − | + | file:partha-ravenloft-105.jpg|11-105<br>Village Mob<br>{{smg|(catalog)}} | |
| − | + | file:partha-ravenloft-105a.jpg|11-105 (a)<br>Village Mob Leader<br>{{smgl|Dennis Mize}} | |
| − | + | file:partha-ravenloft-1051b.jpg|11-105 (b)<br>Village Mob Villager 1<br>{{smgl|Dennis Mize}} | |
| − | + | file:partha-ravenloft-1051c.jpg|11-105 (c)<br>Village Mob Villager 2<br>{{smgl|Dennis Mize}} | |
| − | + | file:partha-ravenloft-1051d.jpg|11-105 (d)<br>Village Mob Villager 3<br>{{smgl|Dennis Mize}} | |
</gallery> | </gallery> | ||
<br> | <br> | ||
| − | + | ===<span id="11-106">11-106 Village Personalities</span>=== | |
<gallery> | <gallery> | ||
| − | + | file:partha-ravenloft-106-03.jpg|11-106<br>Village Personalities<br>{{smg|(blister)}} | |
| − | + | file:partha-ravenloft-106.jpg|11-106<br>Village Personalities<br>{{smgl|Dennis Mize}}<br>{{smg|(catalog)}} | |
| − | + | file:partha-ravenloft-106a.jpg|11-106 (a)<br>Village Personalities<br>The Burgomeister<br>{{smgl|Dennis Mize}} | |
| − | + | file:partha-ravenloft-106b.jpg|11-106 (b)<br>Village Personalities<br>The Doctor<br>{{smgl|Dennis Mize}} | |
| − | + | file:partha-ravenloft-106c.jpg|11-106 (c)<br>Village Personalities<br>Thug<br>{{smgl|Dennis Mize}} | |
| − | + | file:partha-ravenloft-106d.jpg|11-106 (d)<br>Village Personalities<br>Barmaiden<br>{{smgl|Dennis Mize}} | |
</gallery> | </gallery> | ||
<br> | <br> | ||
| − | === | + | ===<span id="11-107">11-107 Goblyns</span>=== |
<gallery> | <gallery> | ||
| − | + | file:partha-ravenloft-107a.jpg|11-107<br>Goblyns (x3)<br>{{smgl|Dennis Mize}} | |
| − | + | file:partha-ravenloft-107.jpg|11-107 (a)<br>Goblyn 1<br>{{smgl|Dennis Mize}} | |
| − | + | file:partha-ravenloft-107b.jpg|11-107 (b)<br>Goblyn 2<br>{{smgl|Dennis Mize}} | |
| − | + | file:partha-ravenloft-107c.jpg|11-107 (c)<br>Goblyn 3<br>{{smgl|Dennis Mize}} | |
</gallery> | </gallery> | ||
<br> | <br> | ||
| − | === | + | ===<span id="11-108">11-108 Great White Stag</span>=== |
<gallery> | <gallery> | ||
| − | + | file:partha-11-108.jpg|11-108<br>Great White Stag<br>{{smg|(blister)}} | |
| − | + | file:partha-ravenloft-108.jpg|11-108<br>Great White Stag<br>{{smgl|Dennis Mize}}<br>{{smg|(catalog)}} | |
| + | file:partha-11-108-01.jpg|11-108<br>Great White Stag<br>{{smgl|Dennis Mize}}<br>{{smg|(assembled)}} | ||
| + | file:partha-11-108a1-01.jpg|11-108 (a1)<br>Stag Body<br>{{smgl|Dennis Mize}} | ||
| + | file:partha-11-108a2-01.jpg|11-108 (a2)<br>Stag Antlers & Ears (x2)<br>{{smgl|Dennis Mize}} | ||
</gallery> | </gallery> | ||
<br> | <br> | ||
| − | === | + | ===<span id="11-109">11-109 Gypsies</span>=== |
<gallery> | <gallery> | ||
| − | + | file:partha-ravenloft-109.jpg|11-109<br>Gypsies<br>{{smgl|Dennis Mize}}<br>{{smg|(catalog)}} | |
| − | + | file:partha-ravenloft-109a.jpg|11-109 (a)<br>Gypsies<br>{{smgl|Dennis Mize}} | |
| − | + | file:partha-ravenloft-109b.jpg|11-109 (b)<br>Gypsies<br>{{smgl|Dennis Mize}} | |
| − | + | file:partha-ravenloft-109c.jpg|11-109 (c)<br>Gypsies<br>{{smgl|Dennis Mize}} | |
</gallery> | </gallery> | ||
<br> | <br> | ||
| − | === | + | ===<span id="11-110">11-110 Gypsy Dancers</span>=== |
<gallery> | <gallery> | ||
| − | + | file:partha-11-110-01.jpg|11-110<br>Gypsy Dancers<br>{{smg|(blister)}} | |
| − | + | file:partha-ravenloft-110.jpg|11-110<br>Gypsy Dancers<br>{{smg|(catalog)}} | |
| − | + | file:partha-ravenloft-110a.jpg|11-110 (a)<br>Gypsy Dancer 1<br>{{smgl|Dennis Mize}} | |
| − | + | file:partha-ravenloft-110b.jpg|11-110 (b)<br>Gypsy Dancer 2<br>{{smgl|Dennis Mize}} | |
| − | + | file:partha-ravenloft-110c.jpg|11-110 (c)<br>Gypsy Dancer 3<br>{{smgl|Dennis Mize}} | |
</gallery> | </gallery> | ||
<br> | <br> | ||
| − | === | + | ===<span id="11-111">11-111 Lords of Ravenloft</span>=== |
<gallery> | <gallery> | ||
| − | + | file:RP-11-111-01.jpg|11-111<br>Lords of Ravenloft<br>{{smg|(blister)}} | |
| − | + | file:partha-ravenloft-111.jpg|11-111<br>Lords of Ravenloft<br>{{smgl|Dennis Mize}}<br>{{smg|(catalog)}} | |
| − | + | file:partha-ravenloft-111a.jpg|11-111 (a)<br>Lords of Ravenloft<br>Strahd Von Zarovich<br>{{smgl|Dennis Mize}} | |
| − | + | file:partha-ravenloft-111b.jpg|{{Gallery-Ribbon|Dragonlance|green}}11-111 (b)<br>Lords of Ravenloft<br>Vlad Drakov<br>{{smgl|Dennis Mize}} | |
| − | + | file:partha-ravenloft-111c.jpg|11-111 (c)<br>Lords of Ravenloft<br>Gabrielle Aderre<br>{{smgl|Dennis Mize}} | |
</gallery> | </gallery> | ||
<br> | <br> | ||
| − | === | + | ===<span id="11-112">11-112 Vampire Hunters</span>=== |
<gallery> | <gallery> | ||
| − | + | file:RP-11-112-01.jpg|11-112<br>Vampire Hunters<br>{{smg|(blister)}} | |
| − | + | file:partha-ravenloft-112.jpg|11-112<br>Vampire Hunters<br>{{smg|(catalog)}} | |
| − | + | file:partha-ravenloft-112d.jpg|11-112 (a)<br>Vampire Hunters<br>Gondegal | |
| − | + | file:partha-ravenloft-112a.jpg|11-112 (b)<br>Vampire Hunters<br>Rudolph Van Richten | |
| − | + | file:partha-ravenloft-112s.jpg|11-112 (c)<br>Vampire Hunters<br>Tara Kolyana | |
</gallery> | </gallery> | ||
<br> | <br> | ||
| − | === | + | ===<span id="11-113">11-113 The Lost Ones</span>=== |
<gallery> | <gallery> | ||
| − | + | file:partha-11-113-01.jpg|11-113<br>The Lost Ones<br>{{smg|(blister)}} | |
| − | + | file:partha-ravenloft-113.jpg|11-113<br>The Lost Ones<br>{{smg|(catalog)}} | |
| − | + | file:partha-ravenloft-113a.jpg|11-113<br>The Lost Ones<br>The Bride | |
| − | + | file:partha-ravenloft-113b.jpg|11-113<br>The Lost Ones<br>The Sailor | |
| − | + | file:partha-ravenloft-113c.jpg|11-113<br>The Lost Ones<br>The Knight | |
</gallery> | </gallery> | ||
<br> | <br> | ||
| − | === | + | ===<span id="11-114">11-114 Wolfweres</span>=== |
<gallery> | <gallery> | ||
| − | + | file:partha-11-114-01.jpg|11-114<br>Wolfweres Hybrid & Victim<br>{{smg|(blister)}} | |
| − | + | file:partha-ravenloft-114.jpg|11-114<br>Wolfweres 4pcs<br>{{smgl|Dennis Mize}}<br>{{smg|(catalog)}} | |
| − | + | file:partha-ravenloft-114c.jpg|11-114 (a)<br>Wolfweres Female Form<br>{{smgl|Dennis Mize}} | |
| − | + | file:partha-ravenloft-114b.jpg|11-114 (b)<br>Wolfweres Hybrid & Victim<br>{{smgl|Dennis Mize}} | |
| − | + | file:partha-ravenloft-114a.jpg|11-114 (c)<br>Wolfweres Male Form<br>{{smgl|Dennis Mize}} | |
</gallery> | </gallery> | ||
<br> | <br> | ||
| − | ====11-115 Zombie Lord and Lackeys<span | + | ===<span id="11-115">11-115 Zombie Lord and Lackeys</span>=== |
<gallery> | <gallery> | ||
| − | + | file:RP-11-115-01.jpg|11-115<br>Zombie Lord and Lackeys (x3)<br>{{smg|(blister)}} | |
| − | + | file:partha-ravenloft-115.jpg|11-115<br>Zombie Lord and Lackeys (x3)<br>{{smgl|Dennis Mize}}<br>{{smg|(catalog)}} | |
| − | + | file:partha-ravenloft-115c.jpg|11-115 (a)<br>Zombie Lackey Female<br>{{smgl|Dennis Mize}} | |
| − | + | file:partha-ravenloft-115a.jpg|11-115 (b)<br>Zombie Lord<br>{{smgl|Dennis Mize}} | |
| − | + | file:partha-ravenloft-115b.jpg|11-115 (c)<br>Zombie Lackey Male<br>{{smgl|Dennis Mize}} | |
</gallery> | </gallery> | ||
<br> | <br> | ||
| − | === | + | ===<span id="11-116">11-116 Ratik Ubel</span>=== |
<gallery> | <gallery> | ||
| − | + | file:Partha-ravenloft-116-02.jpg|11-116<br>Ratik Ubel<br>{{smg|(blister)}} | |
| + | file:partha-ravenloft-116.jpg|11-116<br>Ratik Ubel | ||
</gallery> | </gallery> | ||
<br> | <br> | ||
| − | === | + | ===<span id="11-117">11-117 Man Wolf</span>=== |
<gallery> | <gallery> | ||
| − | + | file:partha-ravenloft-117x.jpg|11-111<br>Man Wolf<br>{{smg|(blister)}} | |
| + | file:partha-ravenloft-117.jpg|11-117<br>Man Wolf<br>{{smgl|Dennis Mize}} | ||
</gallery> | </gallery> | ||
<br> | <br> | ||
| − | === | + | ===<span id="11-118">11-118 Natalia Vorshkova</span>=== |
<gallery> | <gallery> | ||
| − | + | file:partha-ravenloft-118.jpg|11-118<br>Natalia Vorshkova | |
</gallery> | </gallery> | ||
<br> | <br> | ||
| − | === | + | ===<span id="11-119">11-119 Vampires</span>=== |
<gallery> | <gallery> | ||
| − | + | file:partha-ravenloft-119.jpg|11-119<br>Vampires<br>{{smg|(catalog)}} | |
| − | + | file:partha-ravenloft-119a.jpg|11-119 (a)<br>Vampires<br>Orlok | |
| − | + | file:partha-ravenloft-119c.jpg|11-119 (b)<br>Vampires<br>Female Vampire | |
| − | + | file:partha-ravenloft-119b.jpg|11-119 (c)<br>Vampires<br>Bellac Gordol | |
</gallery> | </gallery> | ||
<br> | <br> | ||
| − | ====11-120 Lab Work Tables and Labware<span | + | ===<span id="11-120">11-120 Lab Work Tables and Labware</span>=== |
<gallery> | <gallery> | ||
| − | + | file:partha-ravenloft-120-03.jpg|11-120<br>Lab Work Tables and Labware<br>{{smg|(blister)}} | |
| + | file:partha-ravenloft-120.jpg|11-120<br>Lab Work Tables and Labware<br>{{smg|(catalog)}} | ||
| + | file:partha-ravenloft-120a-01.jpg|11-120 (a)<br>Lab Table w. Books & Skull<br>{{smgl|Jeff Wilhelm}}<br>{{smg|(x2)}} | ||
| + | file:partha-ravenloft-120b-02.jpg|11-120 (b)<br>Potions, Bottles & Labware<br>{{smgl|Jeff Wilhelm}}<br>{{smg|(sprue, x2)}} | ||
</gallery> | </gallery> | ||
<br> | <br> | ||
| − | === | + | ===<span id="11-121">11-121 Assorted Life Energizers</span>=== |
<gallery> | <gallery> | ||
| − | + | file:RP-11-121-01.jpg|11-121<br>Assorted Life Energizers<br>{{smg|(blister)}} | |
| − | + | file:partha-ravenloft-121.jpg|11-121<br>Assorted Life Energizers<br>{{smg|(catalog)}} | |
| + | file:partha-11-121a-01.jpg|11-121 (a)<br>Life Energizer 1 | ||
| + | file:partha-11-121b-01.jpg|11-121 (b)<br>Life Energizer 2 | ||
| + | file:partha-11-121c-01.jpg|11-121 (c)<br>Life Energizer 3 | ||
| + | file:partha-11-121d-01.jpg|11-121 (d)<br>Life Energizer 4 | ||
</gallery> | </gallery> | ||
<br> | <br> | ||
| − | === | + | ===<span id="11-122">11-122 Frantisek Markov</span>=== |
<gallery> | <gallery> | ||
| − | + | file:partha-11-122-01.jpg|11-122<br>Frantisek Markov<br>{{smgl|Dennis Mize}}<br>{{smg|(blister)}} | |
| − | + | file:partha-ravenloft-122.jpg|11-122<br>Frantisek Markov<br>{{smgl|Dennis Mize}} | |
</gallery> | </gallery> | ||
<br> | <br> | ||
| − | === | + | ===<span id="11-123">11-123 Ivana Boritsi</span>=== |
<gallery> | <gallery> | ||
| − | + | file:RP-11-123-01.jpg|11-123<br>Ivana Boritsi<br>{{smgl|Dennis Mize}}<br>{{smg|(blister)}} | |
| − | + | file:partha-ravenloft-123.jpg|11-123<br>Ivana Boritsi<br>{{smgl|Dennis Mize}} | |
</gallery> | </gallery> | ||
<br> | <br> | ||
| − | === | + | ===<span id="11-124">11-124 Alfred Timothy</span>=== |
<gallery> | <gallery> | ||
| − | + | file:partha-ravenloft-124.jpg|11-124<br>Alfred Timothy | |
</gallery> | </gallery> | ||
<br> | <br> | ||
| − | === | + | ===<span id="11-125">11-125 The Witches</span>=== |
<gallery> | <gallery> | ||
| − | + | file:RP-11-125-01.jpg|11-125<br>Witches<br>{{smgl|Dennis Mize}}<br>{{smg|(blister)}} | |
| − | + | file:partha-ravenloft-125.jpg|11-125<br>Witches<br>{{smgl|Dennis Mize}}<br>{{smg|(catalog)}} | |
| − | + | file:partha-ravenloft-125a.jpg|11-125<br>Witches<br>The Maiden<br>{{smgl|Dennis Mize}} | |
| − | + | file:partha-ravenloft-125b.jpg|11-125<br>Witches<br>The Mother<br>{{smgl|Dennis Mize}} | |
| − | + | file:partha-ravenloft-125c.jpg|11-125<br>Witches<br>The Crone<br>{{smgl|Dennis Mize}} | |
</gallery> | </gallery> | ||
<br> | <br> | ||
[[Category:Ral Partha]] | [[Category:Ral Partha]] | ||
Revision as of 19:21, 12 April 2024

Ral Partha produced this Ravenloft range for the AD&D campaign setting.
Contents
- Box Sets
- 10-511 Ravenloft: Denizens
- 10-515 Ravenloft: Castle Forlorn
- 10-517 Ravenloft: Mordenheim's Lab
- Blister Packs
- 11-100 Greater Wolfweres
- 11-101 Werebats
- 11-102 Greater Mummies
- 11-103 Demihuman Vampires
- 11-104 Vampyres
- 11-105 Village Mob
- 11-106 Village Personalities
- 11-107 Goblyns
- 11-108 Great White Stag
- 11-109 Gypsies
- 11-110 Gypsy Dancers
- 11-111 Lords of Ravenloft
- 11-112 Vampire Hunters
- 11-113 The Lost Ones
- 11-114 Wolfweres
- 11-115 Zombie Lord and Lackeys
- 11-116 Ratik Ubel
- 11-117 Man Wolf
- 11-118 Natalia Vorshkova
- 11-119 Vampires
- 11-120 Lab Work Tables and Labware
- 11-121 Assorted Life Energizers
- 11-122 Frantisek Markov
- 11-123 Ivana Boritsi
- 11-124 Alfred Timothy
- 11-125 The Witches
10-511 Ravenloft: Denizens
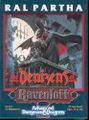
10-511
Ravenloft: Denizens
(box)
10-511
Ravenloft: Denizens
(box back)
10-511
Ravenloft: Denizens
(box detail)
10-511
Ravenloft: Denizens
(catalog)
10-511 (a)
Count Strahd Von Zarovich
Dennis Mize
10-511 (b)
Damsel
Dennis Mize
10-511 (c)
Harkon Lukas
Dennis Mize
10-511 (d)
Gypsy
Dennis Mize
10-511 (e)
Adam
Dennis Mize
10-511 (f)
Vampiress
Dennis Mize
10-511 (g)
Azalin
Dennis Mize
10-511 (h)
Hazlik
Dennis Mize
10-511 (i)
Banshee
Dennis Mize
10-511 (j)
Lord Soth
Dennis Mize


10-515 Ravenloft: Castle Forlorn

10-515
Ravenloft: Castle Forlorn
(box)
10-515
Ravenloft: Castle Forlorn
(box back)
10-515
Ravenloft: Castle Forlorn
(detail)
10-515
Ravenloft: Castle Forlorn
(catalog)
10-515 (a)
Mark ApBlanc
Dennis Mize
10-515 (b)
Tristen ApBlanc
Dennis Mize
10-515 (c)
Morholt ApBlanc
Dennis Mize
10-515 (d)
Rual
Dennis Mize
10-515 (e)
Maeve the Druid
Dennis Mize
10-515 (f)
Shelaugh the Druid
Dennis Mize
10-515 (g)
The Ghost
Dennis Mize
10-515 (h)
Herrd of Clan ApKie
Dennis Mize
10-515 (i)
The Wild Huntsman
Dennis Mize
10-515 (j)
Huntsman Hound 1
Dennis Mize
10-515 (k)
Huntsman Hound 2
Dennis Mize
10-515 (l)
Huntsman Hound 3
Dennis Mize


10-517 Ravenloft: Mordenheim's Lab

10-517
Ravenloft: Mordenheim's Lab
(box)
10-517
Ravenloft: Mordenheim's Lab
(box back)
10-517
Ravenloft: Mordenheim's Lab
(box detail)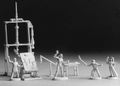
10-517
Ravenloft: Mordenheim's Lab
(catalog)
10-517 (a)
Dr. Victor Mordenheim
10-517 (b)
The Lovely Elise
10-517 (c)
Lab Assistant
10-517 (d)
The Monster10-517 (e)
Large Apparatus
(Machinery of Creation 1)10-517 (f)
Restraining Table
(Machinery of Creation 2)10-517 (g)
Small Apparatus
(Machinery of Creation 3)10-517 (h)
Workbench
(lab equipment)


- Sculptors: Jeff Wilhelm, Dennis Mize
11-100 Greater Wolfweres

11-100
Greater Wolfweres
(catalog)
11-100 (a)
Greater Wolfwere
11-100 (b)
Greater Wolfwere
11-100 (c)
Greater Wolfwere
11-100 (d)
Greater Wolfwere


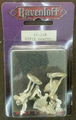
11-101 Werebats

11-101
Werebats
(blister)
11-101
Werebats
(catalog)
11-101 (a)
Werebat 1
Dennis Mize
11-101 (b)
Werebat 2
Dennis Mize
11-101 (c)
Werebat 3
Dennis MizeVariant


11-102 Greater Mummies

11-102
Greater Mummies
(blister)
11-102
Greater Mummies
(4pcs, catalog)
11-102 (a)
Mummy Lord
11-102 (b)
Queen
11-102 (c)
Mummy Servant 1
11-102 (d)
Mummy Servant 2


11-103 Demihuman Vampires

11-103 (d)
Demihuman Vampires
(blister)
11-103
Demihuman Vampires
(3pcs, catalog)
11-103 (a)
Demihuman Vampire
Dwarf
11-103 (b)
Demihuman Vampire
Elf
11-103 (c)
Demihuman Vampire
Halfling


11-104 Vampyres

11-104
Vampyres
(3 pieces)
(blister)
11-104
Vampyres
(3pcs, catalog)
11-104 (a)
Vampyres Male
11-104 (b)
Vampyres Female 1
11-104 (c)
Vampyres Female 2


11-105 Village Mob

11-105
Village Mob
(blister)
11-105
Village Mob
(catalog)
11-105 (a)
Village Mob Leader
Dennis Mize
11-105 (b)
Village Mob Villager 1
Dennis Mize
11-105 (c)
Village Mob Villager 2
Dennis Mize
11-105 (d)
Village Mob Villager 3
Dennis Mize


11-106 Village Personalities

11-106
Village Personalities
(blister)
11-106
Village Personalities
Dennis Mize
(catalog)
11-106 (a)
Village Personalities
The Burgomeister
Dennis Mize
11-106 (b)
Village Personalities
The Doctor
Dennis Mize
11-106 (c)
Village Personalities
Thug
Dennis Mize
11-106 (d)
Village Personalities
Barmaiden
Dennis Mize


11-107 Goblyns

11-107
Goblyns (x3)
Dennis Mize
11-107 (a)
Goblyn 1
Dennis Mize
11-107 (b)
Goblyn 2
Dennis Mize
11-107 (c)
Goblyn 3
Dennis Mize


11-108 Great White Stag

11-108
Great White Stag
(blister)
11-108
Great White Stag
Dennis Mize
(catalog)11-108
Great White Stag
Dennis Mize
(assembled)
11-108 (a1)
Stag Body
Dennis Mize
11-108 (a2)
Stag Antlers & Ears (x2)
Dennis Mize


11-109 Gypsies

11-109
Gypsies
Dennis Mize
(catalog)
11-109 (a)
Gypsies
Dennis Mize
11-109 (b)
Gypsies
Dennis Mize
11-109 (c)
Gypsies
Dennis Mize


11-110 Gypsy Dancers
11-110
Gypsy Dancers
(blister)
11-110
Gypsy Dancers
(catalog)
11-110 (a)
Gypsy Dancer 1
Dennis Mize
11-110 (b)
Gypsy Dancer 2
Dennis Mize
11-110 (c)
Gypsy Dancer 3
Dennis Mize


11-111 Lords of Ravenloft

11-111
Lords of Ravenloft
(blister)
11-111
Lords of Ravenloft
Dennis Mize
(catalog)
11-111 (a)
Lords of Ravenloft
Strahd Von Zarovich
Dennis Mize

11-111 (c)
Lords of Ravenloft
Gabrielle Aderre
Dennis Mize


11-112 Vampire Hunters

11-112
Vampire Hunters
(blister)
11-112
Vampire Hunters
(catalog)
11-112 (a)
Vampire Hunters
Gondegal
11-112 (b)
Vampire Hunters
Rudolph Van Richten
11-112 (c)
Vampire Hunters
Tara Kolyana


11-113 The Lost Ones

11-113
The Lost Ones
(blister)
11-113
The Lost Ones
(catalog)
11-113
The Lost Ones
The Bride
11-113
The Lost Ones
The Sailor
11-113
The Lost Ones
The Knight


11-114 Wolfweres

11-114
Wolfweres Hybrid & Victim
(blister)
11-114
Wolfweres 4pcs
Dennis Mize
(catalog)
11-114 (a)
Wolfweres Female Form
Dennis Mize
11-114 (b)
Wolfweres Hybrid & Victim
Dennis Mize
11-114 (c)
Wolfweres Male Form
Dennis Mize


11-115 Zombie Lord and Lackeys

11-115
Zombie Lord and Lackeys (x3)
(blister)
11-115
Zombie Lord and Lackeys (x3)
Dennis Mize
(catalog)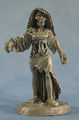
11-115 (a)
Zombie Lackey Female
Dennis Mize
11-115 (b)
Zombie Lord
Dennis Mize
11-115 (c)
Zombie Lackey Male
Dennis Mize


11-116 Ratik Ubel

11-116
Ratik Ubel
(blister)
11-116
Ratik Ubel


11-117 Man Wolf

11-111
Man Wolf
(blister)
11-117
Man Wolf
Dennis Mize


11-118 Natalia Vorshkova

11-118
Natalia Vorshkova

11-119 Vampires

11-119
Vampires
(catalog)
11-119 (a)
Vampires
Orlok
11-119 (b)
Vampires
Female Vampire
11-119 (c)
Vampires
Bellac Gordol


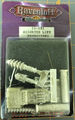
11-120 Lab Work Tables and Labware

11-120
Lab Work Tables and Labware
(blister)
11-120
Lab Work Tables and Labware
(catalog)11-120 (a)
Lab Table w. Books & Skull
Jeff Wilhelm
(x2)11-120 (b)
Potions, Bottles & Labware
Jeff Wilhelm
(sprue, x2)


11-121 Assorted Life Energizers
11-121
Assorted Life Energizers
(blister)
11-121
Assorted Life Energizers
(catalog)11-121 (a)
Life Energizer 111-121 (b)
Life Energizer 211-121 (c)
Life Energizer 311-121 (d)
Life Energizer 4


11-122 Frantisek Markov

11-122
Frantisek Markov
Dennis Mize
(blister)
11-122
Frantisek Markov
Dennis Mize


11-123 Ivana Boritsi

11-123
Ivana Boritsi
Dennis Mize
(blister)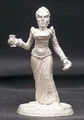
11-123
Ivana Boritsi
Dennis Mize


11-124 Alfred Timothy

11-124
Alfred Timothy

11-125 The Witches

11-125
Witches
Dennis Mize
(blister)
11-125
Witches
Dennis Mize
(catalog)
11-125
Witches
The Maiden
Dennis Mize
11-125
Witches
The Mother
Dennis Mize
11-125
Witches
The Crone
Dennis Mize


