Difference between revisions of "C22 Chaos Hounds & Handlers"
Jump to navigation
Jump to search
| Line 14: | Line 14: | ||
====C22 Chaos Hounds & Handlers<span id="C22-CH"/>==== | ====C22 Chaos Hounds & Handlers<span id="C22-CH"/>==== | ||
<gallery> | <gallery> | ||
| − | image:Citadel-C22-CH-01.jpg|<center>C22 (CH-01)<br>Chaos Dwarf Handler | + | image:Citadel-C22-CH-01.jpg|<center>C22 (CH-01)<br>Chaos Dwarf Handler |
| − | image:Citadel-C22-CH-02.jpg|<center>C22 (CH-02)<br>Dark Elf Handler | + | image:Citadel-C22-CH-02.jpg|<center>C22 (CH-02)<br>Dark Elf Handler |
| − | image:Citadel-C22-CH-03.jpg|<center>C22 (CH-03)<br>Chaos Warrior Handler | + | image:Citadel-C22-CH-03.jpg|<center>C22 (CH-03)<br>Chaos Warrior Handler |
| − | image:Citadel-C22-CH-04.jpg|<center>C22 (CH-04)<br>Rhova, Chaos Hound w. Skull Head | + | image:Citadel-C22-CH-04.jpg|<center>C22 (CH-04)<br>Rhova, Chaos Hound w. Skull Head |
| − | image:Citadel-C22-CH-05.jpg|<center>C22 (CH-05)<br>Dugal, Chaos Hound Leaping | + | image:Citadel-C22-CH-05.jpg|<center>C22 (CH-05)<br>Dugal, Chaos Hound Leaping |
| − | image:Citadel-C22-CH-06.jpg|<center>C22 (CH-06)<br>Stinger, Chaos Hound w. Scorpion Tail | + | image:Citadel-C22-CH-06.jpg|<center>C22 (CH-06)<br>Stinger, Chaos Hound w. Scorpion Tail |
| − | image:Citadel-C22-CH-07.jpg|<center>C22 (CH-07)<br>Whitephang, Chaos Hound w. Mouth Closed, Ears Back | + | image:Citadel-C22-CH-07.jpg|<center>C22 (CH-07)<br>Whitephang, Chaos Hound w. Mouth Closed, Ears Back |
| − | image:Citadel-C22-CH-08.jpg|<center>C22 (CH-08)<br>Weirdspike, Chaos Hound w. Spiked Spine | + | image:Citadel-C22-CH-08.jpg|<center>C22 (CH-08)<br>Weirdspike, Chaos Hound w. Spiked Spine |
| − | image:Citadel-C22-CH-09.jpg|<center>C22 (CH-09)<br>Redeyes Lahse, Chaos Hound w. Tongue Out | + | image:Citadel-C22-CH-09.jpg|<center>C22 (CH-09)<br>Redeyes Lahse, Chaos Hound w. Tongue Out |
| − | image:Citadel-C22-CH-10.jpg|<center>C22 (CH-10)<br>Saberwhulf, Chaos Hound w. Mouth Closed | + | image:Citadel-C22-CH-10.jpg|<center>C22 (CH-10)<br>Saberwhulf, Chaos Hound w. Mouth Closed |
| − | image:Citadel-C22-CH-11.jpg|<center>C22 (CH-11)<br>Two-heads, Chaos Hound w. Two Heads | + | image:Citadel-C22-CH-11.jpg|<center>C22 (CH-11)<br>Two-heads, Chaos Hound w. Two Heads |
| − | image:Citadel-C22-CH-12.jpg|<center>C22 (CH-12)<br>Blackzpott, Chaos Hound w. Mouth Open | + | image:Citadel-C22-CH-12.jpg|<center>C22 (CH-12)<br>Blackzpott, Chaos Hound w. Mouth Open |
| − | image:Citadel-C22-CH-13.jpg|<center>C22 (CH-13)<br>Deathgrypp, Chaos Hound Leaping | + | image:Citadel-C22-CH-13.jpg|<center>C22 (CH-13)<br>Deathgrypp, Chaos Hound Leaping |
</gallery> | </gallery> | ||
<br> | <br> | ||
Revision as of 20:44, 27 August 2020
Citadel's C22 Chaos Hounds & Handlers series featured 3 handlers and a pack of hounds. It was shown in "White Dwarf 95". [1] The figures are credited to Bob Naismith, Jes Goodwin, Alan Perry and Michael Perry. The range was later catalogued within the red catalogue (1991) where all but one of the chaos hounds appeared and were listed as designed by Alan Perry.
Slotta Based Figures
C22 Chaos Hounds & Handlers

C22 (CH-01)
Chaos Dwarf Handler
C22 (CH-02)
Dark Elf Handler
C22 (CH-03)
Chaos Warrior Handler
C22 (CH-04)
Rhova, Chaos Hound w. Skull Head
C22 (CH-05)
Dugal, Chaos Hound Leaping
C22 (CH-06)
Stinger, Chaos Hound w. Scorpion Tail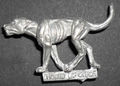
C22 (CH-07)
Whitephang, Chaos Hound w. Mouth Closed, Ears Back
C22 (CH-08)
Weirdspike, Chaos Hound w. Spiked Spine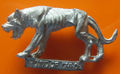
C22 (CH-09)
Redeyes Lahse, Chaos Hound w. Tongue Out
C22 (CH-10)
Saberwhulf, Chaos Hound w. Mouth Closed
C22 (CH-11)
Two-heads, Chaos Hound w. Two Heads
C22 (CH-12)
Blackzpott, Chaos Hound w. Mouth Open
C22 (CH-13)
Deathgrypp, Chaos Hound Leaping


References
- [1], SoL, "White Dwarf 95", page 58
- [2], SoL, "December 1987 Mail Order Flyer"
- [3], SoL, "Citadel Miniatures Catalogue Section 2 (1991)", page 279