Difference between revisions of "Paranoia (Citadel)"
Jump to navigation
Jump to search
Cattwister (talk | contribs) |
|||
| (5 intermediate revisions by the same user not shown) | |||
| Line 9: | Line 9: | ||
{{clear}} | {{clear}} | ||
<br> | <br> | ||
| − | === | + | ===<span id="Para1">Para1</span> Security Guards=== |
<gallery> | <gallery> | ||
| + | image:Citadel-Para1-30.jpg|<center>Para1<br>Guards<br>{{smg|(blister)}} | ||
| + | |||
image:Citadel-Para1-01.jpg|<center>Para1 (01)<br>Computer Console & Boot | image:Citadel-Para1-01.jpg|<center>Para1 (01)<br>Computer Console & Boot | ||
image:Citadel-Para1-02.jpg|<center>Para1 (02)<br>Trooper | image:Citadel-Para1-02.jpg|<center>Para1 (02)<br>Trooper | ||
| Line 20: | Line 22: | ||
image:Citadel-Para1-07.jpg|<center>Para1 (07)<br>Blue Trooper Guard | image:Citadel-Para1-07.jpg|<center>Para1 (07)<br>Blue Trooper Guard | ||
image:Citadel-Para1-08.jpg|<center>Para1 (08)<br>Blue Trooper Officer | image:Citadel-Para1-08.jpg|<center>Para1 (08)<br>Blue Trooper Officer | ||
| − | |||
| − | |||
</gallery> | </gallery> | ||
* CCM reports the "Blue Troopers" as also being called "Vulture Guards".; [[#References|[2]]] | * CCM reports the "Blue Troopers" as also being called "Vulture Guards".; [[#References|[2]]] | ||
<br> | <br> | ||
| − | === | + | ===<span id="Para2">Para2</span> Troubleshooters=== |
<gallery> | <gallery> | ||
| + | image:Citadel-Para2-blister.jpg|<center>Para2<br>Troubleshooters<br>{{smg|(blister)}} | ||
| + | |||
image:Citadel-Para2-01.jpg|<center>Para2 (01)<br>Buck-r-grs | image:Citadel-Para2-01.jpg|<center>Para2 (01)<br>Buck-r-grs | ||
image:Citadel-Para2-02.jpg|<center>Para2 (02)<br>Tomk-r-bee | image:Citadel-Para2-02.jpg|<center>Para2 (02)<br>Tomk-r-bee | ||
| Line 45: | Line 47: | ||
<br> | <br> | ||
| − | === | + | ===<span id="Para3">Para3 Bots</span>=== |
<gallery> | <gallery> | ||
| − | image:Citadel-Para3- | + | image:Citadel-Para3-30.jpg|Para3<br>Robots<br>{{smg|(blister)}} |
| − | image:Citadel-Para3-02.jpg| | + | |
| − | image:Citadel-Para3-02-01.jpg|<center>Para3 (02)<br>Jackobot B<br>{{smg|(assembled & painted)}} | + | image:Citadel-Para3-01.jpg|Para3 (01)<br>Jackobot A |
| − | image:Citadel-Para3-03.jpg|<center>Para3 (03)<br>Scrubot | + | |
| − | image:Citadel-Para3-04.jpg|< | + | image:Citadel-Para3-02.jpg|Para3 (02)<br>Jackobot B |
| − | image:Citadel-Para3-05.jpg| | + | image:Citadel-Para3-02-01.jpg|<center>Para3 (02)<br>Jackobot B<br>{{smg|(assembled & painted example)}} |
| − | image:Citadel-Para3-06.jpg| | + | |
| − | image:Citadel-Para3-07.jpg| | + | image:Citadel-Para3-03.jpg|Para3 (03)<br>Scrubot |
| − | image:Citadel-Para3-08.jpg| | + | image:Citadel-Para3-03-01.jpg|<center>Para3 (03)<br>Scrubot<br>{{smg|(assembled example)}} |
| − | image:Citadel-Para3-09.jpg| | + | |
| − | image:Citadel-Para3-10.jpg| | + | image:Citadel-Para3-04.jpg|Para3 (04)<br>Docbot |
| − | image:Citadel-Para3-11.jpg| | + | image:Citadel-Para3-04-01.jpg|Para3 (04)<br>Docbot<br>{{smg|(assembled example)}} |
| − | image:Citadel-Para3-12.jpg| | + | |
| − | + | image:Citadel-Para3-05.jpg|Para3 (05)<br>Funbot Sm-i-ly | |
| + | image:Citadel-Para3-06.jpg|Para3 (06)<br>Combot RR-7 | ||
| + | image:Citadel-Para3-07.jpg|Para3 (07)<br>Docbot 674-9 | ||
| + | image:Citadel-Para3-08.jpg|Para3 (08)<br>Mechbot | ||
| + | image:Citadel-Para3-09.jpg|Para3 (09)<br>Bot Base - Hover | ||
| + | image:Citadel-Para3-10.jpg|Para3 (10)<br>Bot Base - Legs | ||
| + | image:Citadel-Para3-11.jpg|Para3 (11)<br>Bot Base - Tracks | ||
| + | image:Citadel-Para3-12.jpg|Para3 (12)<br>Bot Base - Wheels | ||
</gallery> | </gallery> | ||
* 2-part figures that you could mix and match the 4 top parts to any of the 4 bottom parts. | * 2-part figures that you could mix and match the 4 top parts to any of the 4 bottom parts. | ||
Latest revision as of 13:44, 28 July 2023
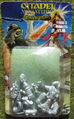
Citadel's Paranoia series appeared in the mid-1980s to support the Paranoia; [1] RPG that Games Workshop sold in their shops and through mail order at the time. The RPG game was written by Greg Costikyan, Dan Gelber, and Eric Goldberg, and first published in 1984 by West End Games (but the GW flyer gives ©1978 to WEG; [3]).
Note: CCM has more complete details on this short-lived series.; [2]
Para1 Security Guards

Para1
Guards
(blister)
Para1 (01)
Computer Console & Boot
Para1 (02)
Trooper
Para1 (03)
Trooper Firing
Para1 (04)
OfficerPara1 (05)
Wee-b-bad
Para1 (06)
Blue Trooper w. Neuro-whip
Para1 (07)
Blue Trooper GuardPara1 (08)
Blue Trooper Officer


- CCM reports the "Blue Troopers" as also being called "Vulture Guards".; [2]
Para2 Troubleshooters

Para2
Troubleshooters
(blister)
Para2 (01)
Buck-r-grs
Para2 (02)
Tomk-r-bee
Para2 (03)
Jonk-r-ter
Para2 (04)
Flashgo-r-den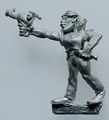
Para2 (05)
Barb-r-ela
Para2 (06)
Oll-y-varPara2 (07)
David-a-dws w. Hover 217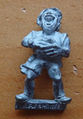
Para2 (08)
Smi-ly-8
Para2 (09)
Troubleshooter Testing RXD's Laser
Para2 (10)
High Programmer
Para2 (11)
Alan-RRR-4
Para2 (12)
Julie WVG:CS2
Para2 (13)
Iam.t.erri.fied:7


Para3 Bots
Para3
Robots
(blister)
Para3 (01)
Jackobot A
Para3 (02)
Jackobot B
Para3 (02)
Jackobot B
(assembled & painted example)
Para3 (03)
Scrubot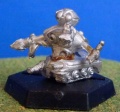
Para3 (03)
Scrubot
(assembled example)
Para3 (04)
Docbot
Para3 (04)
Docbot
(assembled example)
Para3 (05)
Funbot Sm-i-ly
Para3 (06)
Combot RR-7
Para3 (07)
Docbot 674-9
Para3 (08)
Mechbot
Para3 (09)
Bot Base - Hover
Para3 (10)
Bot Base - Legs
Para3 (11)
Bot Base - Tracks
Para3 (12)
Bot Base - Wheels


- 2-part figures that you could mix and match the 4 top parts to any of the 4 bottom parts.
Unreleased
(U01)
Commie w. Big Hat(U02)
Commie Riding Cart
Rulebooks

Paranoia Second Edition
(Games Workshop, UK)

References
- [1], Wikipedia, "Paranoia (role-playing game)"
- [2], CCM "Paranoia" (recommended)
- [3], SoL "Spring 1987 Mail Order Flyer"
- [4], SoL "White Dwarf 83", page 18
- [5], SoL "White Dwarf 89", page 57