Difference between revisions of "Dragon Lords - Dragon of the Month"
Cattwister (talk | contribs) |
|||
| (21 intermediate revisions by 2 users not shown) | |||
| Line 365: | Line 365: | ||
<br> | <br> | ||
| − | ====<span id="2521">2521</span> | + | ====<span id="2521">2521 Wind Dragon</span>==== |
<gallery> | <gallery> | ||
| − | image:g-dotm-2521a.jpg| | + | image:g-dotm-2521a.jpg|2521<br>Wind Dragon<br>{{smg|(box)}} |
| − | image:g-dotm-2521z.jpg| | + | image:g-dotm-2521z.jpg|2521<br>Wind Dragon<br>{{smg|(insert)}} |
| − | image:g-dotm-2521p.jpg| | + | image:g-dotm-2521p.jpg|2521<br>Wind Dragon<br>{{smg|(contents)}} |
| − | image:g-dotm-2521y.jpg| | + | image:g-dotm-2521y.jpg|2521<br>Wind Dragon<br>{{smg|(insert 2)}} |
| − | image:g-dotm-2521b.jpg| | + | image:g-dotm-2521b.jpg|2521<br>Wind Dragon<br>{{smgl|John Dennett}}<br>{{smg|(parts)}} |
| − | image:g-dotm-2521e.jpg| | + | image:g-dotm-2521e.jpg|2521 (a)<br>Wind Dragon<br>{{smgl|John Dennett}} |
| − | image:g-dotm-2521c.jpg| | + | image:g-dotm-2521c.jpg|2521 (b)<br>Bonus Figure 1<br>{{smgl|Andrew Chernak}} |
| − | image:g-dotm-2521d.jpg| | + | image:g-dotm-2521d.jpg|2521 (c)<br>Bonus Figure 2<br>{{smgl|Andrew Chernak}} |
| + | image:g-dotm-2521f.jpg|2521 (d)<br>Weapon Sprue<br>{{smgl|Andrew Chernak}} | ||
</gallery> | </gallery> | ||
<br> | <br> | ||
| Line 415: | Line 416: | ||
* The dragons were released one per month starting in July 1988.<br> | * The dragons were released one per month starting in July 1988.<br> | ||
.<br> | .<br> | ||
| − | ====<span id="9601">9601</span> | + | ====<span id="9601">9601 Black Dragon II</span>==== |
<gallery> | <gallery> | ||
| − | image:g-dotm-9601a.jpg| | + | image:g-dotm-9601a.jpg|9601<br>Black Dragon II<br>{{smgl|Ray Rubin}}<br>{{smg|(box)}} |
| − | image:g-dotm-9601z.jpg| | + | image:g-dotm-9601z.jpg|9601<br>Black Dragon II<br>{{smg|(insert)}} |
| − | image:g-dotm-9601y.jpg| | + | image:g-dotm-9601y.jpg|9601<br>Black Dragon II<br>{{smgl|William Watt}}<br>{{smg|(contents)}} |
| − | image:g-dotm-9601x.jpg| | + | image:g-dotm-9601x.jpg|9601<br>Black Dragon II<br>{{smg|(insert 2)}} |
| − | image:g-dotm-9601b.jpg| | + | image:g-dotm-9601b.jpg|9601 (a)<br>Black Dragon II<br>{{smgl|William Watt}} |
| − | image:g-dotm-9601c.jpg| | + | image:g-dotm-9601c.jpg|9601 (b)<br>Bonus Figure<br>{{smgl|William Watt}}<br>{{gcode|A333}} |
</gallery> | </gallery> | ||
<br> | <br> | ||
| Line 428: | Line 429: | ||
====9602 Red Dragon II<span id="9602"/>==== | ====9602 Red Dragon II<span id="9602"/>==== | ||
<gallery> | <gallery> | ||
| − | image:g-dotm-9602a.jpg|<center>9602<br>Red Dragon II<br>{{smg|(box)}} | + | image:g-dotm-9602a.jpg|<center>9602<br>Red Dragon II<br>{{smgl|Ray Rubin}}<br>{{smg|(box)}} |
image:g-dotm-9602z.jpg|<center>9602<br>Red Dragon II<br>{{smg|(insert)}} | image:g-dotm-9602z.jpg|<center>9602<br>Red Dragon II<br>{{smg|(insert)}} | ||
| − | image:g-dotm-9602.jpg|<center>9602<br>Red Dragon II<br>{{smg|(parts)}} | + | image:g-dotm-9602.jpg|<center>9602<br>Red Dragon II<br>{{smgl|William Watt}}<br>{{smg|(parts)}} |
image:g-dotm-9602b.jpg|<center>9602 (a)<br>Red Dragon II<br>{{smgl|William Watt}} | image:g-dotm-9602b.jpg|<center>9602 (a)<br>Red Dragon II<br>{{smgl|William Watt}} | ||
image:Grenadier9602.jpg|<center>9602 (a)<br>Red Dragon<br>{{smg|(painted by Renee Morgan)}} | image:Grenadier9602.jpg|<center>9602 (a)<br>Red Dragon<br>{{smg|(painted by Renee Morgan)}} | ||
| Line 439: | Line 440: | ||
====<span id="9603">9603</span> White Dragon II==== | ====<span id="9603">9603</span> White Dragon II==== | ||
<gallery> | <gallery> | ||
| − | image:g-dotm-9603a.jpg|<center>9603<br>White Dragon II<br>{{smg|(box)}} | + | image:g-dotm-9603a.jpg|<center>9603<br>White Dragon II<br>{{smgl|Ray Rubin}}<br>{{smg|(box)}} |
image:g-dotm-9603z.jpg|<center>9603<br>White Dragon II<br>{{smg|(insert)}} | image:g-dotm-9603z.jpg|<center>9603<br>White Dragon II<br>{{smg|(insert)}} | ||
image:g-dotm-9603.jpg|<center>9603 (a)<br>White Dragon II<br>{{smgl|William Watt}} | image:g-dotm-9603.jpg|<center>9603 (a)<br>White Dragon II<br>{{smgl|William Watt}} | ||
| Line 448: | Line 449: | ||
====<span id="9604">9604</span> Brass Dragon II==== | ====<span id="9604">9604</span> Brass Dragon II==== | ||
<gallery> | <gallery> | ||
| − | image:g-dotm-9604a.jpg|<center>9604<br>Brass Dragon II<br>{{smg|(box)}} | + | image:g-dotm-9604a.jpg|<center>9604<br>Brass Dragon II<br>{{smgl|Ray Rubin}}<br>{{smg|(box)}} |
image:g-dotm-9604z.jpg|<center>9604<br>Brass Dragon II<br>{{smg|(insert)}} | image:g-dotm-9604z.jpg|<center>9604<br>Brass Dragon II<br>{{smg|(insert)}} | ||
image:g-dotm-9604b.jpg|<center>9604 (a)<br>Brass Dragon II<br>{{smgl|William Watt}} | image:g-dotm-9604b.jpg|<center>9604 (a)<br>Brass Dragon II<br>{{smgl|William Watt}} | ||
| Line 457: | Line 458: | ||
====<span id="9605">9605</span> Green Dragon II==== | ====<span id="9605">9605</span> Green Dragon II==== | ||
<gallery> | <gallery> | ||
| − | image:g-dotm-9605a.jpg|<center>9605<br>Green Dragon II<br>{{smg|(box)}} | + | image:g-dotm-9605a.jpg|<center>9605<br>Green Dragon II<br>{{smgl|Ray Rubin}}<br>{{smg|(box)}} |
image:g-dotm-9605z.jpg|<center>9605<br>Green Dragon II<br>{{smg|(box insert)}} | image:g-dotm-9605z.jpg|<center>9605<br>Green Dragon II<br>{{smg|(box insert)}} | ||
image:g-dotm-9605b.jpg|<center>9605 (a)<br>Green Dragon II<br>{{smgl|William Watt}} | image:g-dotm-9605b.jpg|<center>9605 (a)<br>Green Dragon II<br>{{smgl|William Watt}} | ||
| Line 466: | Line 467: | ||
====<span id="9606">9606</span> Silver Dragon II==== | ====<span id="9606">9606</span> Silver Dragon II==== | ||
<gallery> | <gallery> | ||
| − | image:g-dotm-9606a.jpg|<center>9606<br>Silver Dragon II<br>{{smgl| | + | image:g-dotm-9606a.jpg|<center>9606<br>Silver Dragon II<br>{{smgl|Ray Rubin}}<br>{{smg|(box)}} |
image:g-dotm-9606-02.jpg|<center>9606<br>Silver Dragon II<br>{{smgl|William Watt}}<br>{{smg|(box back)}} | image:g-dotm-9606-02.jpg|<center>9606<br>Silver Dragon II<br>{{smgl|William Watt}}<br>{{smg|(box back)}} | ||
image:g-dotm-9606z.jpg|<center>9606<br>Silver Dragon II<br>{{smgl|William Watt}}<br>{{smg|(insert detail)}} | image:g-dotm-9606z.jpg|<center>9606<br>Silver Dragon II<br>{{smgl|William Watt}}<br>{{smg|(insert detail)}} | ||
| Line 478: | Line 479: | ||
====<span id="9607">9607</span> Blue Dragon II==== | ====<span id="9607">9607</span> Blue Dragon II==== | ||
<gallery> | <gallery> | ||
| − | image:g-dotm-9607a.jpg|<center>9607<br>Blue Dragon II<br>{{smg|(box)}} | + | image:g-dotm-9607a.jpg|<center>9607<br>Blue Dragon II<br>{{smgl|Ray Rubin}}<br>{{smg|(box)}} |
image:g-dotm-9607z.jpg|<center>9607<br>Blue Dragon II<br>{{smg|(insert)}} | image:g-dotm-9607z.jpg|<center>9607<br>Blue Dragon II<br>{{smg|(insert)}} | ||
| − | image:g-dotm-9607.jpg|<center>9607<br>Blue Dragon II<br>{{smg|(contents)}} | + | image:g-dotm-9607.jpg|<center>9607<br>Blue Dragon II<br>{{smgl|William Watt}}<br>{{smg|(contents)}} |
image:g-dotm-9607c.jpg|<center>9607<br>Blue Dragon II<br>{{smgl|William Watt}}<br>{{smg|(catalog)}} | image:g-dotm-9607c.jpg|<center>9607<br>Blue Dragon II<br>{{smgl|William Watt}}<br>{{smg|(catalog)}} | ||
image:g-dotm-9607b.jpg|<center>9607 (a)<br>Blue Dragon II<br>{{smgl|William Watt}} | image:g-dotm-9607b.jpg|<center>9607 (a)<br>Blue Dragon II<br>{{smgl|William Watt}} | ||
| Line 489: | Line 490: | ||
====9608 Copper Dragon II<span id="9608"/>==== | ====9608 Copper Dragon II<span id="9608"/>==== | ||
<gallery> | <gallery> | ||
| − | image:g-dotm-9608a.jpg|<center>9608<br>Copper Dragon II<br>{{smg|(box)}} | + | image:g-dotm-9608a.jpg|<center>9608<br>Copper Dragon II<br>{{smgl|Ray Rubin}}<br>{{smg|(box)}} |
image:g-dotm-9608z.jpg|<center>9608<br>Copper Dragon II<br>{{smg|(insert)}} | image:g-dotm-9608z.jpg|<center>9608<br>Copper Dragon II<br>{{smg|(insert)}} | ||
| − | image:g-dotm-9608c.jpg|<center>9608<br>Copper Dragon II<br>{{smg|(parts)}} | + | image:g-dotm-9608c.jpg|<center>9608<br>Copper Dragon II<br>{{smgl|William Watt}}<br>{{smg|(parts)}} |
image:g-dotm-9608d.jpg|<center>9608 (a)<br>Copper Dragon II<br>{{smgl|William Watt}} | image:g-dotm-9608d.jpg|<center>9608 (a)<br>Copper Dragon II<br>{{smgl|William Watt}} | ||
image:g-dotm-9608b.jpg|<center>9608 (b)<br>Dragon Rider<br>{{smgl|William Watt}} | image:g-dotm-9608b.jpg|<center>9608 (b)<br>Dragon Rider<br>{{smgl|William Watt}} | ||
| Line 499: | Line 500: | ||
====9609 Bronze Dragon II<span id="9609"/>==== | ====9609 Bronze Dragon II<span id="9609"/>==== | ||
<gallery> | <gallery> | ||
| − | image:g-dotm-9609a.jpg|<center>9609<br>Bronze Dragon II<br>{{smg|(box)}} | + | image:g-dotm-9609a.jpg|<center>9609<br>Bronze Dragon II<br>{{smgl|Ray Rubin}}<br>{{smg|(box)}} |
image:g-dotm-9609z.jpg|<center>9609<br>Bronze Dragon II<br>{{smg|(insert)}} | image:g-dotm-9609z.jpg|<center>9609<br>Bronze Dragon II<br>{{smg|(insert)}} | ||
| − | image:g-dotm-9609b.jpg|<center>9609<br>Bronze Dragon II<br>{{smg|(parts)}} | + | image:g-dotm-9609b.jpg|<center>9609<br>Bronze Dragon II<br>{{smgl|William Watt}}<br>{{smg|(parts)}} |
| − | image:g-dotm-9609b2.jpg|<center>9609<br>Bronze Dragon II<br>{{smg|(parts)}} | + | image:g-dotm-9609b2.jpg|<center>9609<br>Bronze Dragon II<br>{{smgl|William Watt}}<br>{{smg|(parts)}} |
image:g-dotm-9609d.jpg|<center>9609 (a)<br>Assembled<br>{{smgl|William Watt}} | image:g-dotm-9609d.jpg|<center>9609 (a)<br>Assembled<br>{{smgl|William Watt}} | ||
image:g-dotm-9609c.jpg|<center>9609 (b)<br>Bonus Figure<br>{{smgl|William Watt}} | image:g-dotm-9609c.jpg|<center>9609 (b)<br>Bonus Figure<br>{{smgl|William Watt}} | ||
| Line 510: | Line 511: | ||
====9610 Gold Dragon II<span id="9610"/>==== | ====9610 Gold Dragon II<span id="9610"/>==== | ||
<gallery> | <gallery> | ||
| − | image:g-dotm-9610a.jpg|<center>9610<br>Gold Dragon II<br>{{smg|(box)}} | + | image:g-dotm-9610a.jpg|<center>9610<br>Gold Dragon II<br>{{smgl|Ray Rubin}}<br>{{smg|(box)}} |
image:g-dotm-9610z.jpg|<center>9610<br>Gold Dragon II<br>{{smg|(insert)}} | image:g-dotm-9610z.jpg|<center>9610<br>Gold Dragon II<br>{{smg|(insert)}} | ||
image:g-dotm-9610b.jpg|<center>9610 (a)<br>Gold Dragon II<br>{{smgl|William Watt}} | image:g-dotm-9610b.jpg|<center>9610 (a)<br>Gold Dragon II<br>{{smgl|William Watt}} | ||
| Line 520: | Line 521: | ||
====<span id="9611">9611</span> Platinum Dragon II==== | ====<span id="9611">9611</span> Platinum Dragon II==== | ||
<gallery> | <gallery> | ||
| − | image:g-dotm-9611a.jpg|<center>9611<br>Platinum Dragon II<br>{{smg|(box)}} | + | image:g-dotm-9611a.jpg|<center>9611<br>Platinum Dragon II<br>{{smgl|Ray Rubin}}<br>{{smg|(box)}} |
image:g-dotm-9611z.jpg|<center>9611<br>Platinum Dragon II<br>{{smg|(insert)}} | image:g-dotm-9611z.jpg|<center>9611<br>Platinum Dragon II<br>{{smg|(insert)}} | ||
image:g-dotm-9611c.jpg|<center>9611 (a)<br>Platinum Dragon II<br>{{smgl|William Watt}} | image:g-dotm-9611c.jpg|<center>9611 (a)<br>Platinum Dragon II<br>{{smgl|William Watt}} | ||
| Line 529: | Line 530: | ||
====<span id="9612">9612</span> Spectral Dragon II==== | ====<span id="9612">9612</span> Spectral Dragon II==== | ||
<gallery> | <gallery> | ||
| − | image:g-dotm-9612a.jpg|<center>9612<br>Spectral Dragon II<br>{{smg|(box)}} | + | image:g-dotm-9612a.jpg|<center>9612<br>Spectral Dragon II<br>{{smgl|Ray Rubin}}<br>{{smg|(box)}} |
image:g-dotm-9612z.jpg|<center>9612<br>Spectral Dragon II<br>{{smg|(insert)}} | image:g-dotm-9612z.jpg|<center>9612<br>Spectral Dragon II<br>{{smg|(insert)}} | ||
| − | image:g-dotm-9612.jpg|<center>9612<br>Spectral Dragon II<br>{{smg|(contents)}} | + | image:g-dotm-9612.jpg|<center>9612<br>Spectral Dragon II<br>{{smgl|William Watt}}<br>{{smg|(contents)}} |
image:g-dotm-9612b.jpg|<center>9612<br>Spectral Dragon II<br>{{smg|(catalog)}} | image:g-dotm-9612b.jpg|<center>9612<br>Spectral Dragon II<br>{{smg|(catalog)}} | ||
image:Grenadier9612SpecII.jpg|<center>9612 (a)<br>Spectral Dragon<br>{{smgl|William Watt}}<br>{{smg|(painted by Renee Morgan)}} | image:Grenadier9612SpecII.jpg|<center>9612 (a)<br>Spectral Dragon<br>{{smgl|William Watt}}<br>{{smg|(painted by Renee Morgan)}} | ||
| − | image:g-dotm-9612d.jpg|<center>9612 (b)<br>Bonus Figure<br>{{ | + | image:g-dotm-9612d.jpg|<center>9612 (b)<br>Bonus Figure<br>{{smgl|William Watt}}<br>{{gcode|A921}} |
</gallery> | </gallery> | ||
<br> | <br> | ||
Latest revision as of 20:46, 26 September 2023

Grenadier released the Dragon Lords - Dragon of the Month ranges in 1984, 1985 and 1989. Confusingly, the 1989 series was marketed as "Dragon of the Month II" - but really it is series three sequentially. The first series included gemstones on plinths and, when you had collected all 12 dragons, they formed a circle. Also for the first series, a special "Dragon Lord" figure was available as a "free gift" after mailing in all 12 proof-of-purchase. The second and third series replaced the gemstones with unique bonus figures not found in other ranges and which are often fogotten about. In the 1990s, a retrospective called "Classic Dragons of the Month" was released and brought back a few of the earlier figures. Many of these dragons were more recently made available again from Mirliton after the demise of Grenadier.
Awards
- Origins Awards / H.G. Wells Awards:
- Best Fantasy or Science Fiction Figure Series of 1985
Dragon of the Month (Series 1)

Series 1
The Completed Set
(painted by Renee Morgan)

2501 Black Dragon

2501
Black Dragon
(box)
2501
Black Dragon
(insert front)
2501
Black Dragon
(insert back)
2501
Black Dragon
(contents)
2501
Black Dragon
(parts)
2501 (a)
Black Dragon
Andrew Chernak2501 (b)
Black Dragon Stone
Andrew Chernak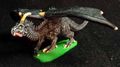
2501
Black Dragon
(painted by Renee Morgan)


- The insert for the black dragon did not credit the sculptor, John Dennett has confirmed that it was sculpted by Andrew Chernak.
2502 Red Dragon

2502
Red Dragon
(box)
2502
Red Dragon
(insert,front)
2502
Red Dragon
(insert,back)
2502
Red Dragon
(contents)
2502 (a)
Red Dragon
(painted by Renee Morgan)
2502 (b)
Red Dragon Stone
John Dennett
2502
Red Dragon
John Dennett
(parts)


2503 White Dragon
2503
White Dragon
(box)
2503
White Dragon
(insert,front)
2503
White Dragon
(insert,back)
2503
White Dragon
(contents)
2503
White Dragon
Andrew Chernak
(parts)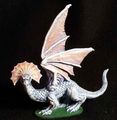
2503 (a)
White Dragon
Andrew Chernak
(painted by Renee Morgan)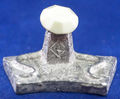
2503 (b)
White Dragon Altar Stone
Andrew Chernak
2503 (b1)
White Dragon Altar
Andrew Chernak2503 (b2)
White Dragon Stone
Andrew Chernak


2504 Brass Dragon

2504
Brass Dragon
(box)
2504
Brass Dragon
(insert,front)
2504
Brass Dragon
(insert,back)
2504
Brass Dragon
(contents)
2504a
Brass Dragon
John Dennett
(9303)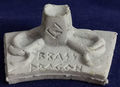
2504b
Brass Dragon Stone
John Dennett
2504b
Brass Dragon Stone
John Dennett
(catalog)


2505 Green Dragon

2505
Green Dragon
(box)
2505
Green Dragon
(insert,front)
2505
Green Dragon
(insert,back)
2505
Green Dragon
(contents)
2505 (a)
Green Dragon Painted
(painted by Renee Morgan)
2505 (a)
Green Dragon
Andrew Chernak
(catalog)
2505 (a1)
Green Dragon Body
Andrew Chernak
2505 (a2)
Green Dragon Left Wing
Andrew Chernak
2505 (a3)
Green Dragon Right Wing
Andrew Chernak
2505 (b)
Green Dragon Altar & Stone
2505 (b)
Green Dragon Altar & Stone
(catalog)
2505 (b1)
Green Dragon Altar
Andrew Chernak2505 (b2)
Green Dragon Stone
Andrew Chernak


2506 Silver Dragon
Box
2506
Silver Dragon
(box)
2506
Silver Dragon
(insert,front)
2506
Silver Dragon
(insert,back)
2506
Silver Dragon
(box contents)
2506a
Silver Dragon
John Dennett
(painted by Renee Morgan)
2506b
Silver Dragon Stone
John Dennett
(catalog)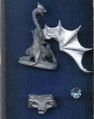
2506
Silver Dragon
John Dennett
(parts)


2507 Blue Dragon

Box
2507
Blue Dragon
(box)
Box
2507
Blue Dragon
(insert,front)
Box
2507
Blue Dragon
(insert,back)
Box
2507
Blue Dragon
(contents)
2507 (a)
Blue Dragon
John Dennett
2507 (b)
Blue Dragon Altar & Stone
John Dennett
2507 (b1)
Blue Dragon Altar
John Dennett2507 (b2)
Blue Dragon Stone
John Dennett


2508 Copper Dragon

2508
Copper Dragon
(box)
2508
Copper Dragon
(insert,front)
2508
Copper Dragon
(insert,back)
2508
Copper Dragon
(contents)
2508a
Copper Dragon
John Dennett
(painted by Renee Morgan)
2508b
Copper Dragon Stone
John Dennett
2508
Copper Dragon
John Dennett
(parts)


2509 Bronze Dragon

2509
Bronze Dragon
(box)
2509
Bronze Dragon
(insert,front)
2509
Bronze Dragon
(insert,back)
2509
Bronze Dragon
(contents)
2509 (a)
Bronze Dragon
John Dennett
(painted by Renee Morgan)
2509 (a)
Bronze Dragon
(parts)
2509 (b)
Bronze Dragon Altar & Stone
catalog
2509 (b1)
Bronze Dragon Altar
John Dennett2509 (b2)
Bronze Dragon Stone
John Dennett


2510 Gold Dragon

2510
Gold Dragon
(box)
2510
Gold Dragon
(insert,front)
2510
Gold Dragon
(insert,back)
2510
Gold Dragon
(contents)
2510 (a)
Gold Dragon
Andrew Chernak
2510 (b)
Gold Dragon Altar & Stone
Andrew Chernak
(catalog)
2510 (b1)
Gold Dragon Altar
Andrew Chernak
2510 (b2)
Gold Dragon Stone
Andrew Chernak


2511 Platinum Dragon

2511
Platinum Dragon
(box)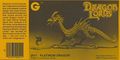
2511
Platinum Dragon
(insert,front)
2511
Platinum Dragon
(insert,back)
2511
Platinum Dragon
(contents)
2511 (a)
Platinum Dragon
John Dennett
2511 (a)
Platinum Dragon
John Dennett
(painted by Renee Morgan)
2511 (b)
Platinum Dragon Altar & Stone
2511 (b)
Platinum Dragon Altar & Stone
John Dennett
(catalog)
2511 (b1)
Platinum Dragon Altar
John Dennett2511 (b2)
Platinum Dragon Stone
John Dennett


2512 Spectral Dragon

2512
Spectral Dragon
(box)
2512
Spectral Dragon
(insert,front)
2512
Spectral Dragon
(insert,back)
2512
Spectral Dragon
(contents)
2512a
Spectral Dragon
Andrew Chernak
2512b
Spectral Dragon Stone
Andrew Chernak
2512a
Spectral Dragon
(painted by Renee Morgan)


- The spectral dragon contains some recycled parts from the other dragons including the heads from Dennett's blue and red dragons and modified versions of the wings from the blue dragon.
The Dragon Lord

(UK1)
The Dragon Lord
(box front)
(UK1)
The Dragon Lord
(insert front)
(UK1)
The Dragon Lord
(insert back)
(UK1)
The Dragon Lord
(box contents)
(UK1)
The Dragon Lord
Andrew Chernak
(parts)
(UK1)
Horns
Andrew Chernak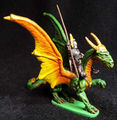
(UK1)
The Dragon Lord
(painted by Renee Morgan)


- Mail Order: only obtainable by returning the 12 proof-of-purchase vouchers from the earlier boxes.
- This figure was later re-released as UK1 War Dragon & Rider.
Dragon of the Month (Series 2)
All of the set in Series 2 credit both John Dennett and Andrew Chernak as the sculptors. John Dennett has confirmed that he sculpted all the dragons and that Andrew Chernak sculpted all the accompanying figures. Numerically, the series seems to continue in Special Editions (Grenadier) (but with other inclusions such as Giants) - this is not the case: 2524 is the last boxed set in Series 2.
2513 Sea Dragon

2513
Sea Dragon
(box)
2513
Sea Dragon
(insert)
2513
Sea Dragon
(insert alt.)
2513
Sea Dragon
(contents)
2513 (a)
Sea Dragon
John Dennett
2513 (b)
Sea Elf 1
A92
Andrew Chernak
2513 (c)
Sea Elf 2
A93
Andrew Chernak


2514 Dragonlisk

2514
Dragonlisk
(box)
2514
Dragonlisk
(insert)
2514
Dragonlisk
(insert detail)
2514
Dragonlisk
(contents)
2514 (a)
Dragonlisk
John Dennett
2514 (b)
Bonus Figure 1
Andrew Chernak
A94
2514 (c)
Bonus Figure 2
Andrew Chernak
A95


2515 Iron Dragon
2515
Iron Dragon
(box)
2515
Iron Dragon
(insert)
2515
Iron Dragon
(parts)
2515 (a)
Iron Dragon
(painted by Renee Morgan)
2515 (b)
Dwarf 1
A106
Andrew Chernak
2515 (c)
Dwarf 2
A105
Andrew Chernak


2516 Chaos Dragon

2516
Chaos Dragon
(box)
2516
Chaos Dragon
(insert)
2516
Chaos Dragon
(contents)
2516
Chaos Dragon
(painted)
2516
2516
Chaos Dragon
(parts)
2516 (a)
Chaos Dragon
John Dennett
2516 (b)
Dwarf 1
Andrew Chernak
A104
2516 (c)
Dwarf 2
Andrew Chernak
A103


2517 Shire Dragon

2517
Shire Dragon
(box)
2517
Shire Dragon
(insert)
2517
Shire Dragon
(contents)
2517 (a)
Shire Dragon
John Dennett
2517 (b)
Bonus Figure 1
Andrew Chernak
A116
2517 (c)
Bonus Figure 2
Andrew Chernak
A115


2518 Swamp Dragon

2518
Swamp Dragon
(box)
2518
Swamp Dragon
(insert)
2518
Swamp Dragon
(contents)
2518
Swamp Dragon
(painted)
2518 (a)
Swamp Dragon
John Dennett
2518 (b)
Bonus Figure 1
Andrew Chernak
M67
2518 (c)
Bonus Figure 2
Andrew Chernak
M66


2519 Frost Dragon

2519
Frost Dragon
(box)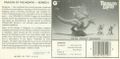
2519
Frost Dragon
(insert)
2519
Frost Dragon
(contents)
2519 (a)
Frost Dragon
John Dennett
2519 (b)
Barbarian w. Axe
Andrew Chernak
(A117)
2519 (c)
Zulu Warrior w. Assegai & Shield
Andrew Chernak
(A118)
2519 (d)
Weapons Sprue
Andrew Chernak


2520 Wyvern Dragon

2520
Wyvern Dragon
(box)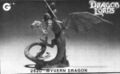
2520
Wyvern Dragon
(insert)
2520
Wyvern Dragon
(contents)2520 (a)
Wyvern Dragon
John Dennett
(9307)
2520 (b)
Bonus Figure
Andrew Chernak
(rider)


2521 Wind Dragon

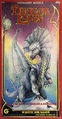
2521
Wind Dragon
(box)
2521
Wind Dragon
(insert)
2521
Wind Dragon
(contents)
2521
Wind Dragon
(insert 2)
2521
Wind Dragon
John Dennett
(parts)
2521 (a)
Wind Dragon
John Dennett2521 (b)
Bonus Figure 1
Andrew Chernak2521 (c)
Bonus Figure 2
Andrew Chernak
2521 (d)
Weapon Sprue
Andrew Chernak


2522 Elven Dragon

2522
Elven Dragon
(box)
2522
Elven Dragon
(insert)
2522
Elven Dragon
John Dennett
(parts)
2522 (a)
Elven Dragon
John Dennett
(painted)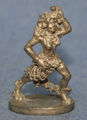
2522 (b)
Bonus Figure 1
Andrew Chernak
A155
2522 (c)
Bonus Figure 2
Andrew Chernak


2523 Storm Dragon

2523
Storm Dragon
(box)
2523
Storm Dragon
(insert)
2523 (a)
Storm Dragon
John Dennett
2523 (b)
Bonus Figure 1
Andrew Chernak
2523 (c)
Bonus Figure 2
Andrew Chernak
A136


2524 Guardian Dragon

2524
Guardian Dragon
(box)
2524
Guardian Dragon
(insert)
2524
Guardian Dragon
(contents)
2524 (a)
Guardian Dragon
John Dennett
(parts)2524 (a)
Guardian Dragon
John Dennett
(9304)
2524 (b)
Bonus Figure 1
Andrew Chernak
A143
2524 (c)
Bonus Figure 2
Andrew Chernak


- A PDF of the full insert can be found here on the Grenadier Yahoo group.
Dragon of the Month II (Series 3)
- The dragons were released one per month starting in July 1988.
.
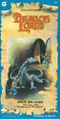
9601 Black Dragon II

9601
Black Dragon II
Ray Rubin
(box)
9601
Black Dragon II
(insert)
9601
Black Dragon II
William Watt
(contents)
9601
Black Dragon II
(insert 2)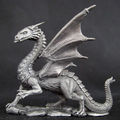
9601 (a)
Black Dragon II
William Watt
9601 (b)
Bonus Figure
William Watt
A333


9602 Red Dragon II

9602
Red Dragon II
Ray Rubin
(box)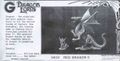
9602
Red Dragon II
(insert)
9602
Red Dragon II
William Watt
(parts)
9602 (a)
Red Dragon II
William Watt
9602 (a)
Red Dragon
(painted by Renee Morgan)
9602 (b)
Bonus Figure
William Watt


9603 White Dragon II

9603
White Dragon II
Ray Rubin
(box)
9603
White Dragon II
(insert)
9603 (a)
White Dragon II
William Watt
9603 (b)
Bonus Figure
William Watt


9604 Brass Dragon II

9604
Brass Dragon II
Ray Rubin
(box)
9604
Brass Dragon II
(insert)
9604 (a)
Brass Dragon II
William Watt
9604 (b)
Bonus Figure
William Watt


9605 Green Dragon II
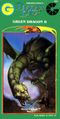
9605
Green Dragon II
Ray Rubin
(box)
9605
Green Dragon II
(box insert)
9605 (a)
Green Dragon II
William Watt
9605 (b)
Bonus Figure
William Watt


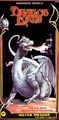
9606 Silver Dragon II

9606
Silver Dragon II
Ray Rubin
(box)
9606
Silver Dragon II
William Watt
(box back)
9606
Silver Dragon II
William Watt
(insert detail)
9606
Silver Dragon II
Parts
William Watt
9606 (a)
Silver Dragon II
William Watt
9606 (b)
Bonus Figure
William Watt
(catalog)
9606 (b)
Bonus Figure
William Watt


9607 Blue Dragon II

9607
Blue Dragon II
Ray Rubin
(box)
9607
Blue Dragon II
(insert)
9607
Blue Dragon II
William Watt
(contents)
9607
Blue Dragon II
William Watt
(catalog)
9607 (a)
Blue Dragon II
William Watt
9607 (b)
Sorceress - Bonus Figure
William Watt


9608 Copper Dragon II

9608
Copper Dragon II
Ray Rubin
(box)
9608
Copper Dragon II
(insert)
9608
Copper Dragon II
William Watt
(parts)9608 (a)
Copper Dragon II
William Watt
9608 (b)
Dragon Rider
William Watt


9609 Bronze Dragon II

9609
Bronze Dragon II
Ray Rubin
(box)
9609
Bronze Dragon II
(insert)
9609
Bronze Dragon II
William Watt
(parts)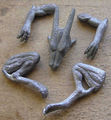
9609
Bronze Dragon II
William Watt
(parts)
9609 (a)
Assembled
William Watt
9609 (b)
Bonus Figure
William Watt


9610 Gold Dragon II

9610
Gold Dragon II
Ray Rubin
(box)
9610
Gold Dragon II
(insert)
9610 (a)
Gold Dragon II
William Watt
9610 (b)
Bonus Figure
William Watt
9610
Gold Dragon II
(catalog)


9611 Platinum Dragon II

9611
Platinum Dragon II
Ray Rubin
(box)
9611
Platinum Dragon II
(insert)
9611 (a)
Platinum Dragon II
William Watt
9611 (b)
Bonus Figure
William Watt
A910


9612 Spectral Dragon II

9612
Spectral Dragon II
Ray Rubin
(box)
9612
Spectral Dragon II
(insert)
9612
Spectral Dragon II
William Watt
(contents)
9612
Spectral Dragon II
(catalog)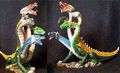
9612 (a)
Spectral Dragon
William Watt
(painted by Renee Morgan)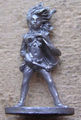
9612 (b)
Bonus Figure
William Watt
A921


Classic Dragons of the Month

9301
Chaos Dragon
(2516 Chaos Dragon)9302
Storm Dragon
(2523 Storm Dragon)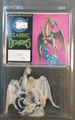
9303
Brass Dragon
(2504 Brass Dragon)
9304
Guardian Dragon
(2524 Guardian Dragon)
9305
Dragon of the Moorraard Swamp
(2518 Swamp Dragon)
9306
Ferindon the Wise Dragon
(2517 Shire Dragon)9307
Wyvern Dragon
(2520 Wyvern Dragon)


- These were released in the 1990s and revisited dragons from the earlier series.
- The card-header in each blister pack doubled as a series of "Dragon Lore Cards".